Setting up presence sync in Microsoft Teams and RingCentral using OAuth or Microsoft Azure
The RingCentral presence sync feature connects a user’s status in RingCentral and Microsoft Teams. This feature must be set up by an admin to provide unified contact searching and bi-directional presence sync for accurate user availability across platforms. Review presence sync mapping examples for users.
In this article
- Prerequisites for presence sync — Requirements before you start
- Choose how to connect — OAuth / Microsoft Azure switch, then Step 1 for the method you chose
- Step 2: Enable presence sync
- Step 3: Customize call presence settings
- Revoking presence sync for users or admins
Prerequisites for presence sync
Before turning on presence sync as an admin:
- Verify all users listed in both the RingCentral Admin Portal and Microsoft admin center have been created and enabled.
- For presence sync to function properly, connections are made between Microsoft Teams and RingCentral accounts using a unique email address login name.
- In RingCentral, this identifier is the email address assigned to the user, and in Microsoft Teams, it’s the user principal name (UPN) or email address of the user.
- You need to have a Microsoft Azure Active Directory (AD) admin account.
- You’ll need to provide authentication to Microsoft Azure AD twice during the setup.
- You need a global admin role for this authentication.
Choose how to connect
Pick OAuth or Microsoft Azure. The Step 1 guide below switches instantly to match your choice (same page, no reload).
What method do you want to use to set up presence sync?
OAuth setup is shown below.
OAuth: Step 1 — Connect your Microsoft 365 account
To connect your Microsoft 365 account using the OAuth method:
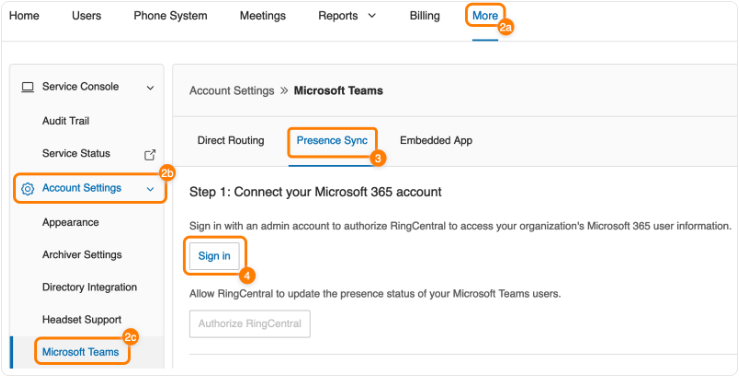
- Sign in to the RingCentral Admin Portal.
- Click the More tab (a), then Account Settings (b), and then Microsoft Teams (c).
- Click the Presence Sync tab if you’re not automatically directed to that page.
-
Click Connect via OAuth.
-
In the popup, enter your Microsoft 365 credentials and click Sign in.
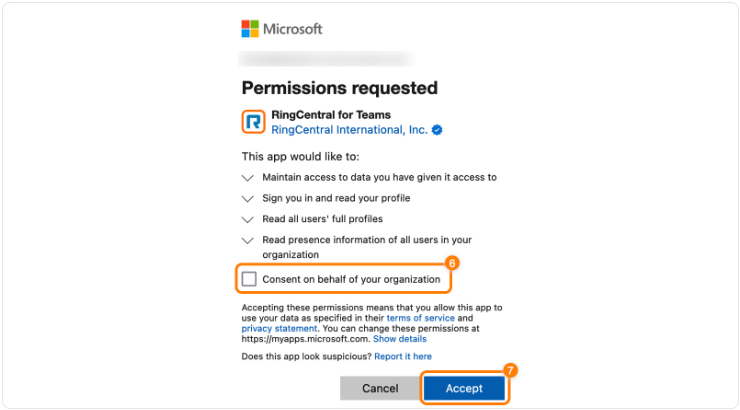
- Check the box next to Consent on behalf of your organization.
-
Click Accept. The popup will close.
-
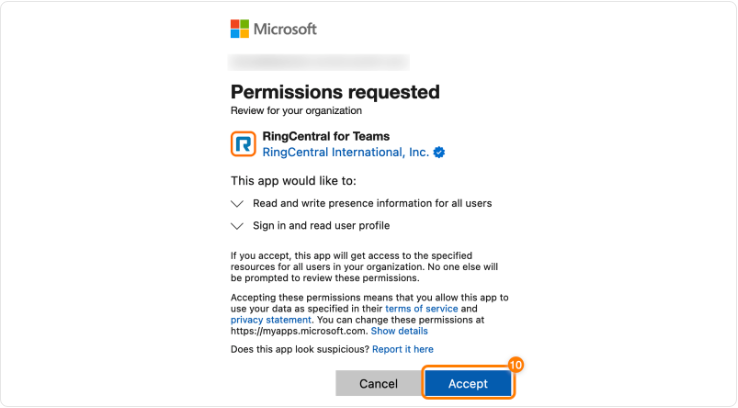
Click Authorize RingCentral.

-
Re-enter your credentials if prompted.
-
Click Accept. The popup will close.
-
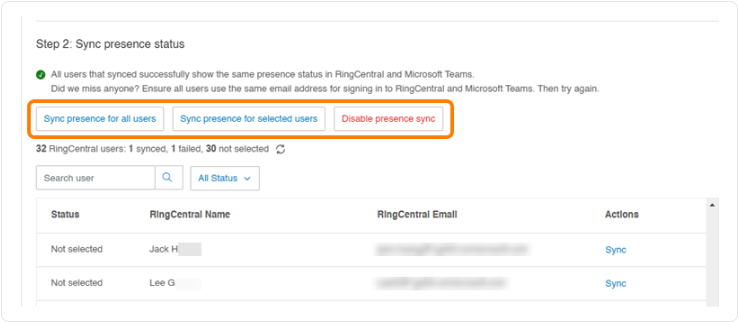
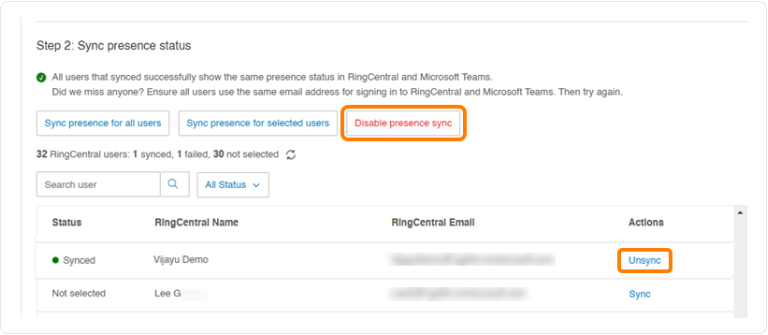
Verify Sync presence status. You can Sync presence for all users, Sync presence for selected users, or Disable presence sync when you are ready for Step 2.
-
If you have call queues set up, you can turn the Customize RingCentral call presence with Microsoft Teams Presence toggle on or off.
Note
Logins must be consistent across both platforms, or presence sync won’t work correctly for the users.
Microsoft Azure: Step 1 — Connect your Microsoft 365 account
-
In Microsoft Azure, create or use an app registration with the correct Microsoft Graph application permissions for your RingCentral Teams integration. Use Getting credentials from Microsoft Azure as a reference for registering the app, client secret, and admin consent.
One app registration for Embedded App and Presence Sync
You can use one Azure app registration for both the Embedded App and Presence Sync. Connect that registration to Embedded App and Presence Sync in the Admin Portal when you’re ready.
-
Sign in to the RingCentral Admin Portal.
- Go to More → Account Settings → Microsoft Teams → Presence Sync tab.
- Click Connect via Microsoft Azure.
- Enter Application (client) ID, Directory (tenant) ID, and client secret (and expiration if prompted), then click Connect.
When the connection succeeds, continue with Step 2: Enable presence sync.
Step 2: Enable presence sync
Once your Microsoft 365 account is connected (via OAuth or Microsoft Azure), you can Sync presence for all users or Sync presence for selected users.

You can also Disable presence sync for all users.
Once the sync completes, a confirmation message will appear, and you’ll receive an email including details on the number of synchronized users and if any users failed to sync.
Note
Presence Sync will stop working for users if the Microsoft admin’s connection to the RingCentral account is interrupted.
Step 3: Customize call presence settings
You can then set up specific rules for accepting calls based on a user’s status in Microsoft Teams by customizing call presence settings. This feature maps specific Microsoft Teams presence states to RingCentral call handling rules. Incoming calls will then be managed based on the user’s availability in Microsoft Teams.
These settings override the default presence sync behavior set up in Step 2.
Note
Presence configurations made in this step are one-way only. Changes in Microsoft Teams update RingCentral call handling, but changes in RingCentral presence don’t update Microsoft Teams.
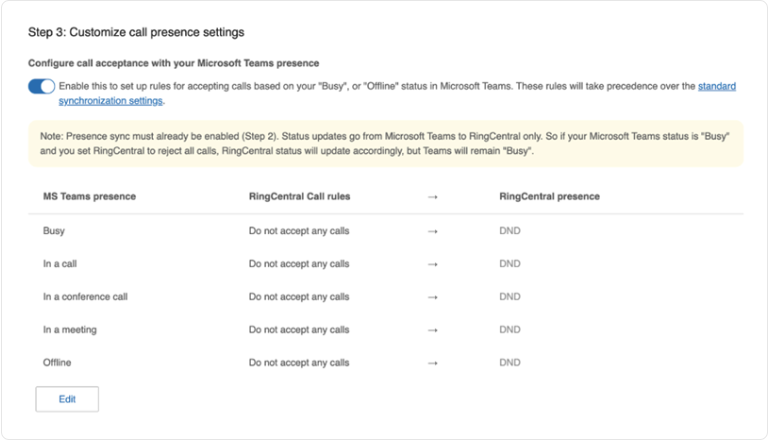
To update call presence settings:
- Click the toggle on to set up rules for accepting calls based on your status in Microsoft Teams.
- Click Edit to modify the call handling rules for each status.
Microsoft Teams presence
- Busy
- In a call
- In a conference call
- In a meeting
- Offline
RingCentral call rules
- Accept all calls: All incoming calls will ring through to the user, regardless of their Teams presence.
- Do not accept queue calls: Direct calls will ring through, but calls from call queues will not.
- Do not accept any calls: All incoming calls will be blocked.
RingCentral presence
The RingCentral presence status is automatically set based on the selected call rule:
- Accept all calls: RingCentral presence changes to Busy or Offline.
- Do not accept queue calls: RingCentral presence changes to Busy or Offline.
- Do not accept any calls: RingCentral presence is set to Do Not Disturb (DND).
- Click Save. You can click Reset to default to restore the previous default settings.
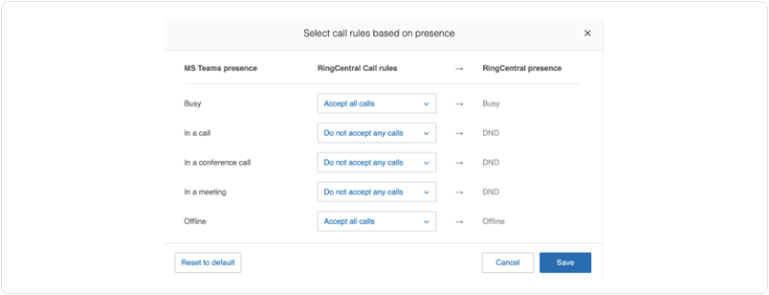
Example
For example, if a user’s Microsoft Teams status is In a meeting and the Do not accept any calls rule is selected, RingCentral will:
- Set the user’s RingCentral presence to DND.
- Prevent all incoming calls from ringing through to the user.
Important
If your Microsoft Teams Busy status is mapped to RingCentral’s Do Not Disturb (DND), your Teams status may still show Busy or DND after your call or meeting ends on either platform. This can happen when you make or receive a RingCentral call during a Teams call or meeting, or the other way around.
To reset your status, manually change it back to Available in Teams.
You can also turn the toggle on to Preserve the RingCentral status during app inactivity. This feature maintains a user’s RingCentral presence, ignoring Microsoft Teams status changes due to app inactivity. The user’s original presence stays the same until they choose to change it manually in the RingCentral app.
Revoking presence sync for users or admins
To turn off presence sync for all users in your organization, click Disable presence sync.
You can also turn off presence sync for individual users by clicking Unsync under the Actions column in the user list.
To turn presence sync back on at the admin level, use the OAuth / Microsoft Azure switch under Choose how to connect, complete Step 1 for that method, then continue with Step 2.